I’ll apologize for my English since it’s not my native language, but I’ll try to make myself as clear as possible.
Many people don’t understand very well the process (or at least the basics) of exporting a mesh to XNA from Blender. There are a few basic concepts that the user should know.
First, I’ll describe a scenario and then, I’ll enumerate what you should know: Suppose we have our game and we need a 3d object to be displayed. We all have done this in the past, but sometimes we just don’t understand why our object is not behaving the way it should we we apply a transformation. Even worse, some times we don’t even know where to place a camera because we don’t understand the “size” of the model.
I’ll try to explain those points here, I cannot assure I’ll be able to do it in a simple way, maybe because of my rusty english or maybe because it’s just a little hard (I’,m sure it’s because of my enlgish).
Object’s center position:
In blender, we you are creating or editing a model, you will notice a pink dot; This dot is used as reference to apply transforms. When you export the model to XNA, this little dot is also exported as a parent bone, and we apply a transformation this bone is also used as reference.
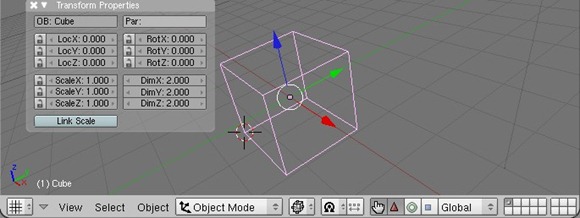
For example, we have a scenario with a plane as a the floor placed in Y = 0 and we want to add a cube in some position, so we go to blender to create our cube:
In blender we add a cube to an empty project (as shown in the picture above) and we export it (without ANY modification), the reference point will be in the center of the volume. (Notice the pink dot in the screenshot above).
As I said before, our floor is at Y = 0, and we want the cube to be placed above the floor (the bottom face should be at Y = 0 too). To achieve this, we translate our cube to (2,0,1) . This position, should be above the floor, since our Y component is 0.
If we do such transformation, we’ll notice our cube is half above, half under the floor: this is because we have tell XNA to move THE PINK DOT to (2,0,1). If you understood all this, you already know how to fix this: We have to change the position of the pink dot in blender.
How to do this:
Create a cube in blender and be sure it’s on the 0,0,0 position. You can do this by selecting the cube and open the transform properties dialog (N shortcut). You’ll notice 3 fields: LocX, LocY and LocZ. Set them with 0 and you’ll have it centered.
Go to edit mode (TAB key) and choose face as selection mode (Ctrl + Tab –> faces). Now select the bottom face:
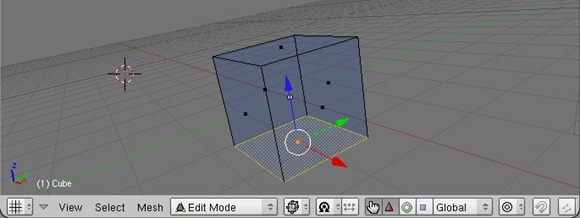
Nothing strange so far, we have just added a new object (in this case a cube), we have centered it and now we have selected a face we want as reference in our game.
Now, we are going to move that little dot from the center of the volume to the center of the bottom face: With the bottom face selected, press SHIFT + S; this will bring the “align dialog” popup, Choose “Cursor –> Active”. You’ll notice that the cursor (not the pink dot) will be placed in the center of the bottom face.
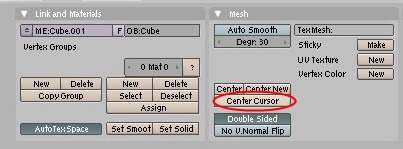
Now, to translate the pink dot, exit edit mode (TAB key) and in the buttons window choose, in the Mesh tab choose “Center Cursor”. Now, you should have your reference centered in the bottom face.
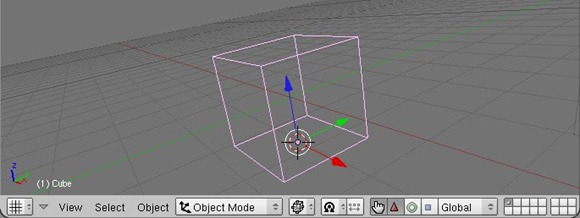
Important !!!
Many people doesn’t know this, but when you modify a model, the transformations are not directly mapped to XNA. If you are noticing different units or scales ALWAYS apply all transformation to the model: Select the model and press Ctrl + A + 1. You can also achieve this by selecting the model and from the menu go to:
Object –> Clear/Apply –> Apply Scale/rotation to Obj Data
About the size:
There seems to be a bug or something with the fbx exporter and objects are scaled 10 times from blender to XNA. To solve this, in the export window change the Scale to 0.01.
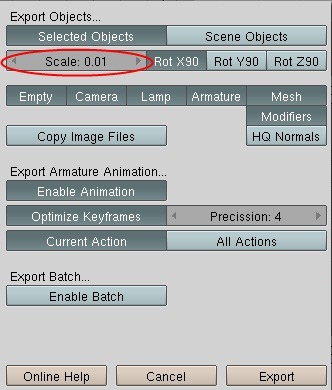
Please notice that this can be applied to several type of objects. Characters and trees may have the reference under their feet but maybe planets or stars will be OK with their reference point in the center.
